Setting up a tent can be both exciting and daunting, especially if you’re a camping newbie. You want to make sure you have a cozy and secure shelter for your outdoor adventure, but where do you begin? In this article, we’ll provide you with all the essential steps and tips on how to properly set up your tent, ensuring a hassle-free and enjoyable camping experience. So let’s get started on building your temporary home in the great outdoors!

Choosing the Right Location – For Properly Set Up My Tent
Consider the Terrain
When choosing a location for your tent, it’s important to consider the terrain. Look for a spot that is flat and even, as this will provide a stable foundation for your tent. Avoid areas with rocky ground or uneven surfaces, as it can make setting up your tent more difficult and uncomfortable.
Check for Level Ground
Before setting up your tent, make sure to check for level ground. A flat surface will ensure that your tent is stable and won’t roll or shift during the night. Use a level or simply walk around the area to check for any slopes or dips in the ground.
Avoid Low-Lying Areas
Low-lying areas can be prone to collecting water, especially during rainy weather. To avoid waking up to a soggy tent, it’s best to steer clear of these areas. Look for higher ground or areas with good drainage to ensure a dry and comfortable camping experience.
Look for Natural Windbreaks
When choosing a location for your tent, keep an eye out for natural windbreaks such as trees, bushes, or large rocks. These features can provide some protection from strong winds, making your camping experience more enjoyable. Positioning your tent behind a windbreak can also help to create a cozy and sheltered sleeping area.
Preparing the Tent
Unpack and Organize
Before you start setting up your tent, take the time to unpack and organize all the components. Lay them out in an orderly manner so that you can easily locate each part when you need it. This will make the assembly process much smoother and more efficient.
Clear the Site
Once you have unpacked and organized your tent, it’s important to clear the site where you will be setting it up. Remove any rocks, sticks, or debris that may be on the ground, as these can cause discomfort and damage to your tent. Clearing the site will also ensure that your tent is properly anchored to the ground.
Lay Out the Groundsheet
Most tents come with a groundsheet or footprint that serves as a protective layer between the tent floor and the ground. Lay out the groundsheet in the desired location before setting up the tent. This will help protect the bottom of your tent from abrasions and moisture, extending its lifespan.
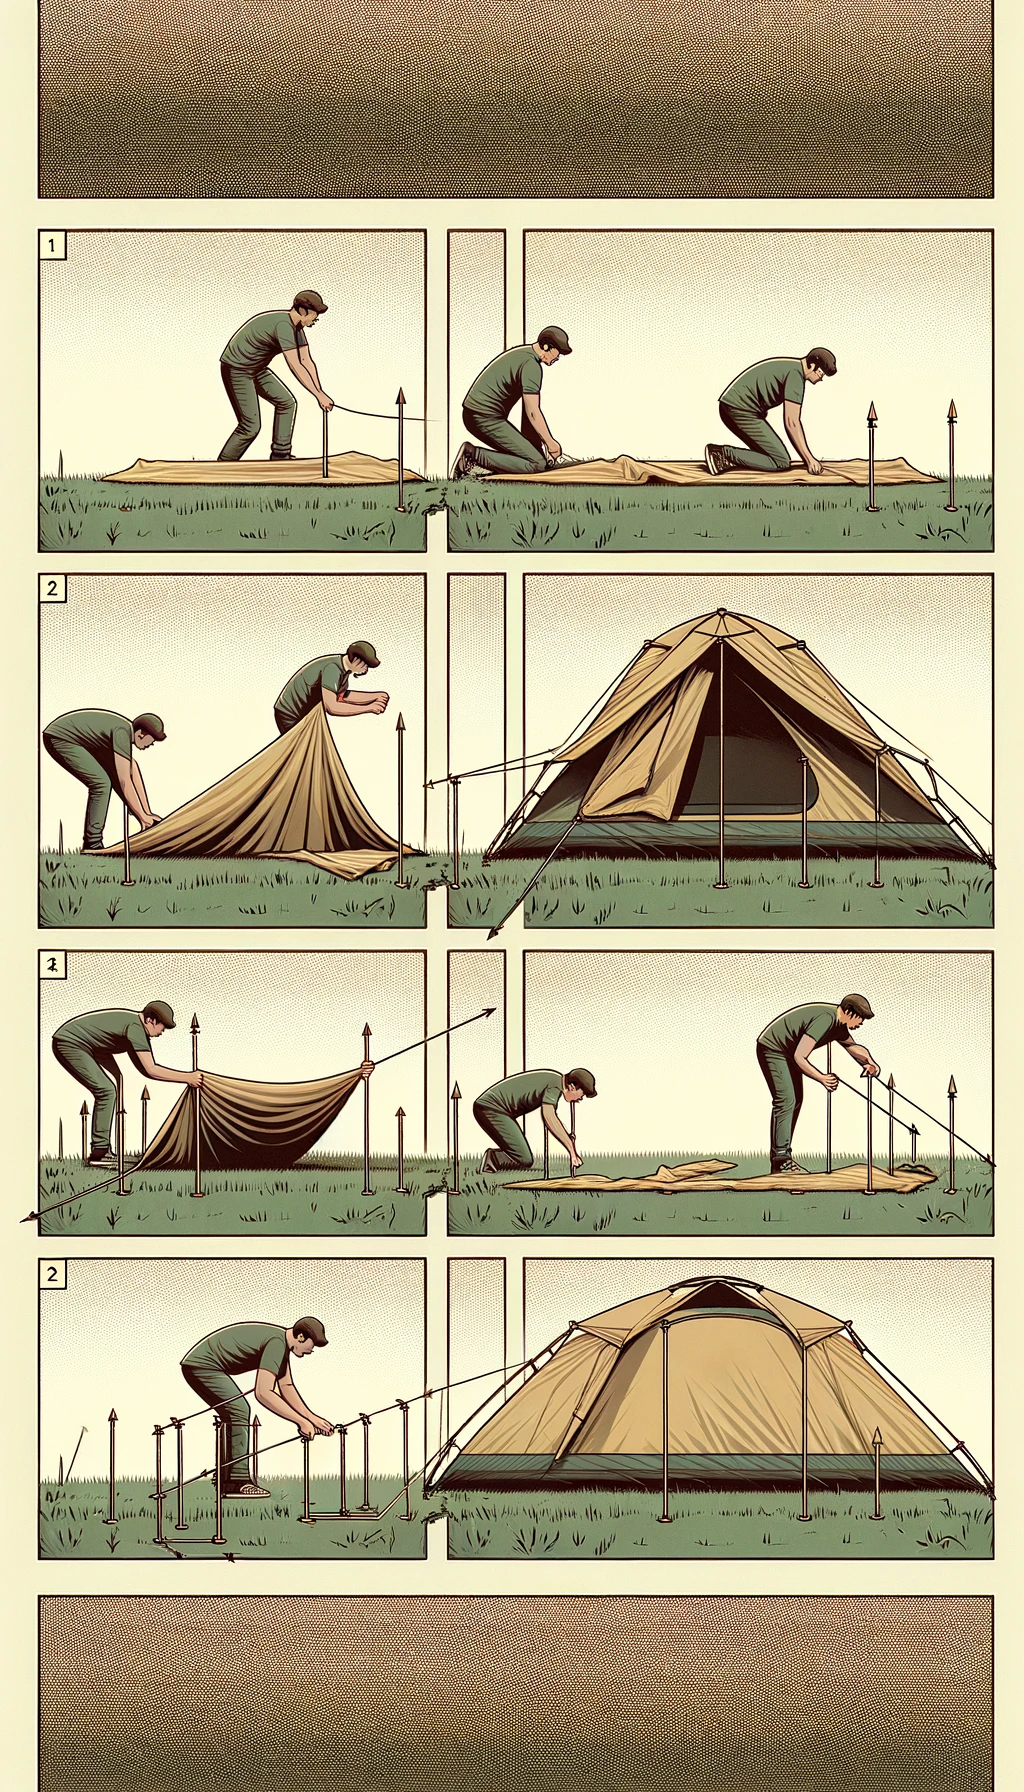
Assembling the Tent
Identify the Tent Parts
Before you start assembling your tent, take a moment to familiarize yourself with the different parts. Identify the tent body, rainfly, poles, and stakes. Knowing what each component is will make the assembly process much easier and less confusing.
Spread Out the Tent Body
Once you have identified the tent body, spread it out flat on the ground. Make sure it is centered on your chosen location and align it with the direction you want the entrance to face. Smooth out any wrinkles or folds to ensure a taut and secure setup.
Insert the Tent Poles
Inserting the tent poles is the next step in assembling your tent. Follow the instructions provided by the manufacturer to correctly insert each pole into the corresponding sleeves or clips on the tent body. Once all the poles are in place, gently flex them to create tension and support the structure of the tent.
Attach the Rainfly
The rainfly is an essential part of your tent, as it provides additional protection from rain and acts as a barrier against condensation. Attach the rainfly to the tent body, making sure it is properly aligned and secured with the provided hooks or clips. Pull the rainfly tight to ensure it covers the entire tent and provides maximum protection.
Secure the Tent Stakes
To ensure that your tent remains stable in various weather conditions, it’s important to secure the tent stakes properly. Insert the stakes through the loops or grommets on the tent body and then drive them into the ground at a 45-degree angle. Make sure they are firmly anchored to prevent the tent from shifting or collapsing.
Adjust the Tension
Once all the components of your tent are in place, take a moment to adjust the tension. Smooth out any sagging areas or wrinkles by readjusting the stakes and poles. Tension is important for a well-structured tent that can withstand wind and rain, so take the time to ensure everything is taut and secure.
Securing the Tent Stakes
Choose Suitable Stakes
When securing your tent, it’s important to choose suitable stakes that will hold up against various ground conditions. Lightweight aluminum stakes are a popular choice due to their durability and versatility. However, if you’re camping on softer ground, longer and thicker stakes may be necessary to ensure a secure anchor.
Position the Stakes Correctly
To maximize stability, it’s crucial to position the stakes correctly. Insert them through the designated loops or grommets on the tent body, ensuring they are at a 45-degree angle to the ground. Placing the stakes too close to the tent or at an incorrect angle can compromise the overall structure and stability of your tent.
Secure the Stakes Firmly
Once you have positioned the stakes, it’s important to secure them firmly in the ground. Use a mallet or a rock to drive the stakes into the ground, ensuring they are firmly anchored. Remember to leave a small amount of the stake exposed, so they can be easily removed when it’s time to pack up.
Setting Up the Rainfly
Identify the Rainfly
The rainfly is an important component of your tent, as it provides protection from rain, wind, and condensation. Before setting up the rainfly, make sure to identify it among your tent components. It is typically a separate piece made of waterproof material.
Position the Rainfly Correctly
To ensure maximum protection, it’s important to position the rainfly correctly. Align the rainfly with the tent body, making sure it covers the entire tent. Ensure that the doors or windows on the rainfly match up with those on the tent body, allowing for easy access without compromising protection.
Attach the Rainfly to the Tent
Attaching the rainfly to the tent is the next step in setting up this crucial component. Most rainflies come with hooks or clips that easily attach to the corresponding points on the tent body. Follow the instructions provided by the manufacturer to ensure a proper and secure attachment.
Secure the Rainfly
To ensure that the rainfly provides optimal protection, it’s important to tighten it securely. Adjust the tension of the rainfly by tightening the straps or drawstrings to remove any slack. This will prevent water from pooling on the rainfly and ensure superior protection from the elements.
Ventilating the Tent
Identify Ventilation Points
Proper ventilation is essential for a comfortable and condensation-free tent. Identify the ventilation points, such as mesh windows or vents, on your tent. These areas allow for air circulation and can help reduce moisture buildup inside the tent.
Ensure Proper Airflow
To maximize airflow and minimize condensation, it’s important to position your tent in a way that allows for proper air circulation. Position doors and windows facing the prevailing wind, as this will encourage a breeze to flow through the tent. Additionally, leave vents or windows slightly open to promote airflow while maintaining privacy and protection.
Use Tent Ventilation Features
Many tents come with built-in ventilation features, such as adjustable vents or mesh panels. Take advantage of these features to regulate airflow and control the tent’s internal temperature. Adjusting the vents and opening up mesh panels can help reduce condensation and keep the tent comfortable throughout the night.
Consider Climate Conditions
When ventilating your tent, it’s important to consider the climate conditions you will be camping in. In hot and humid environments, maximizing airflow is crucial to prevent overheating and excessive moisture buildup. In colder climates, it’s essential to balance airflow with insulation to maintain warmth without compromising ventilation.
Organizing the Interior
Place Sleeping Equipment
When organizing the interior of your tent, start by placing your sleeping equipment. Set up your sleeping bags, sleeping pads, or air mattresses in a comfortable and accessible location. Consider the number of people sharing the tent and arrange the sleeping areas accordingly.
Set Up Camp Furniture
If you have camp furniture such as camping chairs or a table, arrange them in a convenient location inside the tent. Create a cozy and functional space for relaxation, meals, and activities. Keep in mind that bulky or heavy furniture may take up valuable space and make the tent feel crowded, so choose accordingly.
Create Storage Areas
To keep your tent organized during your camping trip, create designated storage areas for your belongings. Use small storage containers, hanging organizers, or gear lofts to keep personal items, clothing, and camping gear neatly organized and easily accessible. This will help maximize interior space and prevent clutter.
Maintaining a Clean Tent
Keep Shoes Outside
To keep your tent clean and minimize dirt and debris inside, always keep your shoes outside. Set up a designated area outside the tent where everyone can leave their footwear. This will prevent dirt, mud, and insects from being tracked into the tent, making for a more comfortable and cleaner camping experience.
Use a Ground Cloth
Using a ground cloth or tarp underneath your tent can provide an additional layer of protection against moisture and abrasions. It helps prevent the tent floor from getting dirty and extends its lifespan. Make sure the ground cloth is slightly smaller than the tent footprint to prevent rain from pooling underneath.
Clean the Tent Regularly
Regular cleaning of your tent is important to maintain its longevity and functionality. After each camping trip, remove any dirt, debris, or spills from the tent fabric. Use a gentle brush or sponge and mild soap to spot clean any stains. Avoid using harsh chemicals or scrubbing vigorously, as this can damage the waterproof coating and fabric.
Allow for Drying
Before packing up your tent, make sure it is completely dry. Moisture trapped in the tent can lead to mold and mildew growth, which can damage the fabric and create unpleasant odors. Hang the tent in a well-ventilated area or use a tent drying rack if available. Ensure all components, including the rainfly and stakes, are thoroughly dry before packing them away.
Dismantling and Packing
Detach the Rainfly
When dismantling your tent, start by detaching the rainfly from the tent body. Carefully unhook or unclip the rainfly, making sure not to damage any parts or the tent fabric. Fold the rainfly neatly and set it aside for packing.
Remove the Tent Stakes
Remove the tent stakes by carefully pulling them out of the ground. Clean off any dirt or debris and place them in a designated bag or container for storage. Inspect the stakes for any damage and replace any that are bent or broken.
Disassemble the Tent
Disassembling the tent involves removing the tent poles, folding the tent body, and packing it away. Carefully remove the tent poles, following the manufacturer’s instructions. Start folding the tent by collapsing the poles and gently folding the tent body in a compact manner. Avoid sharp bends or creases that could damage the fabric.
Clean and Dry the Components
Before packing, take the time to clean and dry all the tent components. Wipe off any dirt or debris from the tent body, poles, and rainfly. Allow them to air dry completely to prevent any moisture buildup that could lead to mold and mildew growth.
Pack the Tent
Once all the components are clean and dry, it’s time to pack up the tent. Start by folding the tent body into a compact size and placing it in its storage bag or stuff sack. Pack the tent stakes, poles, and rainfly in their respective storage compartments. Make sure everything is packed securely to prevent any damage during transportation.
Important Tips and Tricks
Practice Setting Up at Home
Before heading out on your camping adventure, it’s a good idea to practice setting up your tent at home. This will not only familiarize you with the assembly process but also help you identify any missing parts or address any issues before you’re out in the wilderness.
Learn to Recognize Parts
Knowing how to identify and recognize the different parts of your tent is important for a smooth setup. Take the time to become familiar with the tent body, rainfly, poles, and stakes. This knowledge will save you time and frustration when it comes to assembling and disassembling your tent.
Bring Extra Stake and Pole
It’s always a good idea to bring extra tent stakes and poles. Accidents happen, and it’s not uncommon for stakes to get lost or poles to get damaged. Having spares on hand will ensure that you can quickly address any issues and keep your tent secure and functional.
Address Any Tent Issues Immediately
If you encounter any issues with your tent, such as tears, broken zippers, or damaged poles, address them immediately. Ignoring problems can lead to further damage and compromise the functionality and lifespan of your tent. Carry a tent repair kit with you or seek professional repair services if necessary.
Setting up your tent properly is key to a successful and enjoyable camping experience. By choosing the right location, preparing the tent, assembling it correctly, securing the stakes and rainfly, ventilating the tent, organizing the interior, maintaining cleanliness, and following proper dismantling and packing procedures, you can ensure a comfortable and hassle-free camping trip. Remember to practice setting up your tent at home, learn to recognize the different parts, bring extra stakes and poles, and address any issues immediately. With these tips and tricks, you’ll be well-equipped to set up your tent like a pro and create lasting memories in the great outdoors. Happy camping!
Leave a Reply